Have you ever wondered if your Keurig coffee maker needs to be cleaned? If you’re a fan of quick and delicious coffee at home or the office, taking care of your Keurig is crucial. Regular maintenance ensures a great-tasting cup of coffee and extends the lifespan of the machine. In this article, you’ll learn everything you need to know about keeping your Keurig in tip-top shape.

Why Cleaning Your Keurig is Important
Cleaning your Keurig is not just about maintaining good hygiene; it’s also about performance and taste. Over time, coffee makers accumulate residue, limescale, and potentially mold or bacteria. These buildups can affect the taste of your coffee and may also hinder the machine’s functionality.
Health Considerations
Leaving your Keurig uncleaned for extended periods can pose health risks. Bacteria and mold can find their way into the internal components, affecting your coffee quality and safety. Regular cleaning will help you avoid any unwanted microorganisms in your morning brew.
Performance and Longevity
Limescale and mineral deposits from hard water can build up in the machine’s water lines. This can lead to blockages, reducing the efficiency of your Keurig. Regular descaling can prevent these issues, ensuring that your machine works smoothly for years to come.
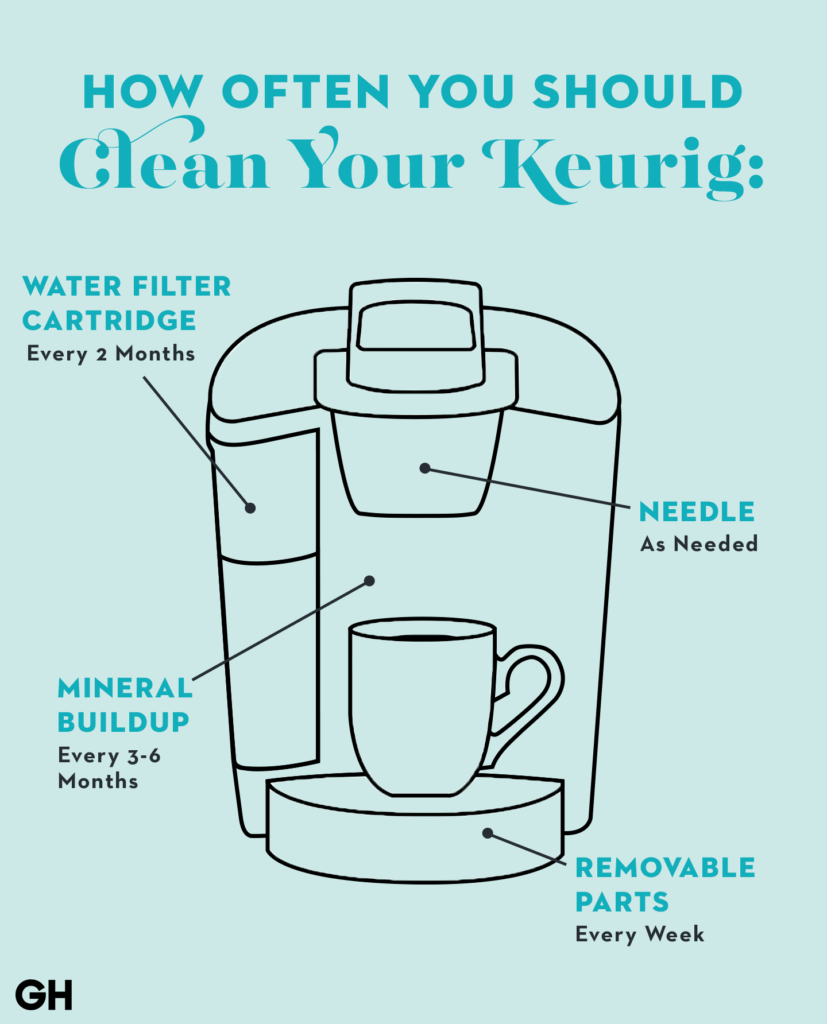
How Often Should You Clean Your Keurig?
It’s good to follow a routine cleaning schedule for your Keurig. The frequency of cleaning depends on how often you use your machine. Here are some general guidelines to follow:
Daily Maintenance
You should clean certain parts of your Keurig daily to keep it in good working condition. This includes:
- Emptying the water reservoir: Do this to prevent the growth of bacteria and mold.
- Wiping down the exterior: Use a damp cloth to clean the outer surfaces.
- Cleaning the drip tray: Empty and clean it to avoid spills and stains.
Weekly Maintenance
Every week, take a few extra steps to maintain your Keurig:
- Clean the K-Cup holder: Remove any coffee grounds or residue.
- Rinse the water reservoir: Fill it with fresh water and let it sit for a few minutes before rinsing.
Monthly Maintenance
For deeper cleaning, follow these monthly tasks:
- Descale the machine: Use a descaling solution or a mixture of vinegar and water.
- Deep clean the water reservoir: Use mild soap and water.
- Check and clean the needles: These piercing needles can get clogged, affecting the flow of coffee.
Steps to Clean Your Keurig
Now that you know why and how often you should clean your Keurig, let’s get into the actual steps involved in cleaning different parts of the machine.
Cleaning the Exterior
- Unplug the machine: Safety first!
- Wipe down surfaces: Use a damp cloth or mild detergent.
- Dry thoroughly: Make sure no moisture is left on the electrical components.
Cleaning the Water Reservoir
- Remove the reservoir: Take it off the machine.
- Wash with soap and water: Use a mild dish soap.
- Rinse thoroughly: Ensure no soap remains.
- Dry with a lint-free cloth: Prevent any lint from clogging the machine.
Cleaning the K-Cup Holder
- Remove the holder: Carefully take it out.
- Rinse under running water: Remove all coffee grounds.
- Use a brush for stubborn residue: A toothbrush works well.
- Dry completely: A dry holder prevents mold growth.
Descaling the Machine
Descaling helps to remove mineral deposits and limescale. Here is how you can do it:
- Prepare the solution: Use a commercial descaling solution or mix vinegar and water in equal parts.
- Fill the reservoir: Pour the solution into the water reservoir.
- Run the brew cycle: Without a K-Cup, run the machine as you would to make coffee.
- Repeat as necessary: Continue until the reservoir is empty.
- Rinse the machine: Run several cycles with fresh water to remove any descaling solution residue.
Cleaning the Needles
Needles can get clogged, disrupting the flow of coffee. Here’s how you can clean them:
- Unplug the machine: Again, safety first!
- Use a cleaning tool or paperclip: Insert it into the needle holes.
- Move gently: Dislodge any coffee grounds stuck inside.
- Rinse and dry: Make sure the needle area is dry before reassembly.
Common Cleaning Issues and Troubleshooting
Sometimes, even after regular cleaning, you might face issues with your Keurig. Here are some common problems and their solutions:
Reduced Water Flow
If you notice reduced water flow, it might be due to clogged needles or mineral buildup.
Solution: Clean the needles and descale the machine.
Strange Taste or Odor
If your coffee tastes off or has a strange smell, it could be due to residual coffee oils or dirty components.
Solution: Deep clean the water reservoir and descale the machine.
Machine Not Brewing
When your Keurig doesn’t brew, it could be due to blockages or electrical issues.
Solution: Ensure that all parts are properly assembled and try descaling. If issues persist, consult Keurig customer service.

Tips and Tricks for Keeping Your Keurig Clean
Keeping a clean Keurig doesn’t have to be a hassle. Here are some tips to make the process easier:
Use Filtered Water
Using filtered water can reduce mineral buildup inside your Keurig, thereby reducing the need for frequent descaling.
Empty the Reservoir Overnight
Empty the water reservoir at night to prevent bacteria growth. Refill it with fresh water in the morning.
Wipe After Each Use
A quick wipe of the drip tray and K-Cup holder after each use can prevent the build-up of coffee residue and oils.
Keep It Covered
When not in use for extended periods, cover your Keurig to prevent dust from settling into the machine.
Can You Use Household Items for Cleaning?
You can use various household items to clean your Keurig effectively. These include:
- Vinegar: Great for descaling.
- Dish soap: Useful for cleaning the water reservoir and drip tray.
- Toothbrush: Helps to scrub hard-to-reach areas.
- Paperclip: Perfect for cleaning the needles.

Keurig Cleaning Products
If you prefer specialized products, there are many Keurig-specific cleaning solutions available. These include:
- Descaling solutions: Specially formulated to remove limescale.
- Cleaning pods: Convenient for cleaning the brew head.
- Water filter cartridges: Help reduce mineral buildup.
Table: Comparison of Cleaning Methods
| Cleaning Method | Purpose | Frequency |
|---|---|---|
| Vinegar Solution | Descaling and removing mineral deposits | Monthly |
| Dish Soap | Cleaning the water reservoir and drip tray | Weekly |
| Toothbrush | Scrubbing hard-to-reach areas | As needed |
| Paperclip | Cleaning the needles | As needed |
| Cleaning Pods | Cleaning the brew head | Monthly |
| Descaling Solutions | Descaling without vinegar smell | Monthly |
| Water Filters | Reducing mineral buildup | Replace every 2 months |
Conclusion
Cleaning your Keurig is essential for maintaining both the taste of your coffee and the functionality of the machine. Regular cleaning routines, combined with occasional deep cleaning, will keep your Keurig running smoothly and ensure you enjoy a delicious cup of coffee every time. Whether you use household items or specialized cleaning products, what’s important is you maintain a consistent cleaning schedule.
By understanding the importance of cleaning, how often to do it, and the steps involved, you’ll be well-prepared to keep your Keurig in excellent condition for years to come. Happy brewing!

